Dreamweaver Basics and Tutorial
Table of Contents
Overview of Dreamweaver
About Dreamweaver
Obtaining the software
Dreamweaver Tutorial - Basic Features
Defining a Site
Dreamweaver Layout
Basic Elements
Save your file locally
Publishing and Maintaining the Site
Dreamweaver Tutorial - Advanced Features
Site Management
Rollovers and JavaScript Behaviors
Templates
Navigation Bars
Cascading Style Sheets
Get Help
Help menu
I. Overview of Dreamweaver
A. About Dreamweaver
Dreamweaver is Haverford's supported web editor. It has features for both the beginning and advanced web page creator. Dreamweaver integrates many aspects of Web development, including page creation, site management, and web server tools, giving the user a good perspective of an entire web site. Dreamweaver also supports JavaScript and Cascading Style Sheets, along with other advanced functions.
Here is a brief summary of some of the elements that Dreamweaver offers:
Site Management - An integrated file transfer client and visual site map allow site navigation, file linking, and uploading/synchronization of your site.
Template - Templates allow users to quickly edit all common elements, such as navigation bars, throughout a whole site.
Cascading Style Sheets - CSS allow users to quickly change the appearance of text elements throughout the site.
JavaScript Behaviors - Dreamweaver behaviors are JavaScripts that you can apply without having to deal with the necessary code.Each of these elements are discussed below.
B. Obtaining the software
Dreamweaver is a commercial software program, sold by Macromedia. Haverford students, faculty and staff may download a "keyed" version of the software. This keeps track of how many people are using the program at once, assuring us compliance with our software license. Download Dreamweaver as you download other Haverford software.
If you do not have the Keyserver software installed on your machine, you can install it, along with Dreamweaver, from the Software Download page.
II. Dreamweaver Tutorial - Basic Features
This section provides an overview of the basic features of Dreamweaver. It is designed as a tutorial on building a course web site from scratch. Files have been prepared to work with the steps in this tutorial: tutorial.zip. (On a Macintosh with OS X, these files should download and open when you click on the tutorial.zip link. On a Windows XP computer, you must extract or unzip them by right-clicking the downloaded archive and selecting "Extract All." Use the resultant folder to locate the files later referred to in this tutorial.)
This section can also serve as Dreamweaver reference guide without requiring the tutorial files.
Getting Help
If you have questions about the topics covered in this guide, you can go through the tutorial while experimenting more with the described tools and options. There are also a wealth of Dreamweaver options and functions not covered in this tutorial. This tutorial is also a good steppingstone to the tutorial that comes with Dreamweaver, available from the Help menu.
Dreamweaver also has an extensive online help system which can be accessed by choosing Help > Using Dreamweaver.
A. Defining a Site
Dreamweaver operates based upon the concept of a web site. When you first open the program, Dreamweaver makes you define a site. This helps you keep all files organized. With a simple web site, you will just need to keep a few files within a file folder. However, it is best to plan this out before you start, since folder maintenance will help greatly as your site grows and you start linking to other web pages and adding graphics.
We do have some folder conventions for faculty. If you are updating an existing site, you will want to use the current folder structure. If you are working with others on a site (such as a department, special project, or student club) you will need to work closely so that you can coordinate your files, file structure and layout.
The instructions below assume you are using ACC's tutorial files inside a folder called My Documents.
Open the Site Files window. You can open this window by choosing Site > Site Files.
In the window that opens, choose Define Sites as shown below.
Choose New in the window that pops up. Select the Advanced tab in the Site Definition window. Dreamweaver will now ask for name of the site and where it is on your hard drive. For now, just enter the Local Info. Enter the relevant information. Make sure you enter the location of the Tutorial folder on your computer and not what is shown below.We will look at Remote Info in the section on Site Management.
B. Dreamweaver Layout
Dreamweaver allows you to insert objects and change their attributes with the floating panels and menu commands. Dreamweaver for Windows also has the option to have fixed panels instead of floating panels. Once objects have been inserted on the page, they appear as they will when the web page is published online.
Once you start Dreamweaver, you may see a blank Web page with 3 floating panels:
Insert Panel: By default, this is the top menu bar on both PC and Macintosh. It has graphical buttons or icons for objects that can be inserted into a web page. These include images, tables and applets. You can select different types of objects from the tabs at the top of the panel. The Common list is the default.
Properties Panel: By default, this panel is below your web page. It looks like a Word processor formatting toolbar. When you choose an element on the Web page, you can adjust its properties here. You can toggle the advanced properties by clicking the small white arrow in the lower right corner of the panel.
Answer Panel: By default, this panel appears at the bottom of listed panels on the right. If it does not automatically appear, click on the arrow next to Answers to maximize the panel. You can quickly access the Dreamweaver tutorials and other information here.
All of Dreamweaver's panels can be moved, or opened and closed via the Window menu.
Examine the contents of Dreamweaver's drop down menus. Experiment with moving the panel's around by dragging them by their title bars. On a Windows PC, you can close a panel by clicking on the drop-down menu on the top right to "Close Panel Group"; on a Macintosh you can click on the red dot in the upper left corner. To reopen panels, choose Window on the menu bar of the blank Web page. The first 3 options are the basic floating panels that are available. Checked items are the ones currently open. To reopen a panel, just select it from the menu:
C. Basic Elements
This section covers how to insert text, hyperlinks, images, horizontal rules and tables; how to change their appearance using the Properties panel; and how to copy and import text from Word.
We will begin building our course web site from scratch, and as we develop the site we will use more sophisticated elements. In this section, you will make a basic page. Many of the following steps are similar to what would be done in a normal word processing program.
Type the title of the course in the document window:
From the File menu, Save your web page now in the Tutorial folder as start.html. (Note: We will discuss saving and file names a more in the next section.)
Use a soft return to separate the line into two. Move the cursor to right after the colon. While holding down the Shift key, press the Enter key.
Soft Returns and Hard Returns
Pressing the Enter key results in a hard return, and a line break that acts like double-space.
Holding the Shift key while pressing the Enter key results in a soft return, and will act like a single space.Highlight the text by clicking and holding at the beginning of the text and dragging the cursor to the end of the text.
With the text selected, change its appearance by changing its properties in the Properties panel.
In the drop-down menu, change the format to Heading 3
In the drop-down menu, change the font to Arial,Helvetica,sans-serif
Selecting from the four alignment buttons on the right, change the alignment to Center
The bold and italic features are in this panel (underlines are conventionally reserved in Web documents for hyperlinks). Indenting and list features are also be found here.Your text selection should now look like this:
The Undo Command
If you ever make a mistake, you can undo it by choosing Edit > Undo on the top menu or the equivalent keyboard shortcut (as noted in the menu).
Enter a page title under Modify > Page Properties. You can change other page settings here.
Insert a horizontal rule right after the text. A horizontal rule visually divides the page up and often makes the page more clear. Click the mouse at the end of the selected text to place the cursor at the end of the line. Press Enter once to start a new line. From the Insert Panel on the left, choose the object that is shown below:
Alternatively, you can insert horizontal rules by choosing Insert > Horizontal Rule from the top menu.
Moving the cursor with the arrow keys
Right after you insert the horizontal rule, it is selected. To place the cursor right after the horizontal rule, press the -> key on your keyboard.Insert an image on the page. Start a new line and change the alignment to left-aligned with the Properties panel at the bottom of the screen. From the Common tab in the Insert menu on top, choose the object that is shown below:
(You can also choose Image from the Insert menu). A new window will appear asking you to specify where the image file is. Navigate to the folder where you saved the tutorial files and select the image named "collage.jpg". Select the image file and click OK. Dreamweaver will then insert the image in the page. With each substantial image you insert, you should also enter an accompanying ALT tag - within the Properties panel - for users unable to see images.
Add an absolute hyperlink to the Haverford College home page. Start a new line and type the words Haverford College. Now highlight these words. In the Properties panel, type in the URL of the Haverford home page, http://www.haverford.edu, in link section. When you press Enter, the link will be added, indicated by the underline and a change in the text's color. Note: Rather than typing "http://www.haverford.edu" you can cut and paste this from your browser window. This will help ensure that you type the link correctly. Not all links are eligible as hyperlinks. Some links are not stable, meaning that the same page may not always have the same address; you cannot link to such pages directly.
About Links
When linking to another web page you can either use an absolute link (such as http://www.haverford.edu) with the full address of a file, or a relative link (such as filename.html), which points to a file that is on the same web site--often in the same folder or in a subfolder--relative to the page linking that file.
You can also link to a specified spot within a web page. Such a spot is called an anchor link. You need to first create an anchor in your web page, and then link to it.
One other popular type of link is a mailto link. This type of link lets your readers email a comment or question to the person at the linked address.
Now is a good time to save your file and to start work on a related file. From the File menu select Save. (See more about saving files below.)
Create a separate file for a related web page called "about.html"
Add a description of the course, copying text from a Microsoft Word document. Start your text editing program and open the file named "blurb.doc" (included with this tutorial). Highlight the text and copy it. In Dreamweaver, start a new line under the Haverford link and choose Edit > Paste.
Notice that Dreamweaver does not include any font or size attributes from the text editor. To do so, you need to import Word HTML into Dreamweaver. We will try that now.
Choose File > Import > Import Word HTML (note that you can import other file formats here as well). Open the "blurb.html" included with the tutorial file. This HTML file was saved using Word's Save as HTML feature. In the window that opens, leave the default selections as they are and click OK. A new Web page window opens with the description text which retains the font and size attributes. Highlight the text and copy it. Your Web page window is now hidden behind this new one. Close the new Web window without saving. Highlight the text that we pasted before, and choose Edit > Paste.
Clean Up Word HTML
When a document is saved using MS Word's Save as HTML feature, Word imbeds many tags into the document that some programs will not use. To remove these tags, choose Commands > Clean up Word HTML.
Because the image that was inserted takes up the whole row space it is in, there is an awkward blank space in the middle of our page. We can use tables to solve problems like these. Using tables, textual and graphical elements can be arranged better. To position the cursor right before the image, click the image to select it and then press the <- arrow key. With the cursor in front of the image, start a new line and then use the Up key to move to this new line. From the Common tab in the Insert menu on top, choose the object that is shown below: (You can also choose Table from the Insert menu). In the window that pops up, enter the following settings: We will now copy the image and the hyperlink into the left cell of the table, and the description text into the right cell of the table. This time we will use cut and paste because we don't want two copies of everything on the page. Highlight the image and hyperlink and choose Edit > Cut. Click inside the left cell of the table and choose Edit > Paste (keyboard shortcuts for these commands will also work). You can also click and drag the objects into the appropriate places. Now cut and then paste the description text into the right cell. Your Web page should now look like this.
Check the spelling in the page. You can add words to Dreamweaver's personal dictionary as needed.
Spell Checking
To spell-check a document, choose Check Spelling from the Text menu.
You now have a basic Web page. To preview your Web page in a browser, choose File > Preview in Browser > [Browser]. It is best to preview your page in several browsers (for example, Netscape and Internet Explorer). It may look different with different browsers.
D. Save your File Locally
When you save your file, you need to consider the structure of your web site and use a legal file name. From the File menu, select Save.
Be sure to save your files into the top level of your site (the top folder) or the correct subfolder. This should follow the structure determined during your site definition process discussed above.
You also need to follow the general rules for filenames on the web.
Use proper extensions (.html, .jpeg, .gif)
No spaces, no slashes, no colons, no percent signs, no asterisks
If in doubt, stick with letters and numbers only
Special file names: welcome.html, index.html
For additional information about filenames, see the ACC web page, Naming Your Web Files and Folders.
E. Publishing the Site
Once you have the page the way you want it, you are ready to post it for all to see. There are several methods with which to post pages. Refer to the special instructions for faculty or students (linked from the ACC home page) to find out where you can post.
Regardless of where you are posting, Dreamweaver provides a handy tool to help you with this process. In this section we will go through the steps necessary to put a web page online using Dreamweaver.
Caution: Only use Dreamweaver site definition features you understand. There are some features that can potentially delete or change files posted by others in your work group.
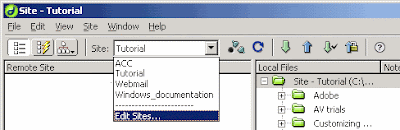
Open the Site Files window. You can open this window by choosing Site> Site Files.
In the window that opens, choose Edit Sites as shown below.
Select the site you are using, Tutorial, and click on Edit.
Select Remote Info on the left, and enter the relevant information. The information you enter varies, depending upon the system from which you are connecting, and whether you are posting to the College's official web server (www.haverford.edu), posting to the student web server (student.haverford.edu), or posting to another web server at Haverford or elsewhere.
Make sure you enter the correct access method server name or location. In most cases you will want to access the web server via Local/Network. However, if you are off-campus, you may need to access via FTP. Either way, you need a valid password to access the server. If you are accessing the server via Local/Network, you may also need to mount the server before you can set up or use the Dreamweaver site management tool. Again, refer to the instructions for faculty or students (linked from the ACC home page) to find out how to access the server you need from the system you are using.
From Windows PC to www.haverford.edu
If you are posting to the college web (www.haverford.edu) server from a PC.
Click OK.
From a Macintosh to www.haverford.edu
If you are posting from a Macintosh to www.haverford.edu, Then use the following settings:
Mount webpublish.haverford.edu in the HC ACC Services AppleTalk zone.
Edit the site definition
Select the Advanced menu.
Select Remote Info from the left menu.
Where prompted for Access type, select Local/Network.
Where prompted for Remote Folder select webpublish.haverford.edu:www:your department folder You are ready to upload the files onto the server. Back on the Site Files window, click on the Connect button (). Once connected, highlight the "start.html" file and the "download" folder. Then click on Put (the blue up arrow). Dreamweaver uses the same directory structure that is on your computer. Your files are now online; you can use your Web browser to view the page by entering the correct URL. Once the file is posted, you can use Dreamweaver's Get (the green down arrow) and Refresh (the dark blue circular arrow) buttons are used to download and synchronize files on the Web server with those on your computer.You can then make any changes needed to your file, and post again. This is useful for correcting any errors, or making other changes to your page(s) now, or in the future.
III. Dreamweaver Tutorial - Advanced
This section provides an overview of the advanced features of Dreamweaver. It continues the tutorial from the previous section, but can also serve as Dreamweaver reference guide without requiring the tutorial files.
Aside: For HTML Programmers
To view and edit the HTML source to your Web page, select HTML Source from the Window menu (there are also corresponding buttons on the Document Toolbar). A split-window code and design view, color-coded HTML, and an integrated code reference are new features in Version 4 and MX.
Dreamweaver is more forgiving than most Web editors in not adjusting the HTML coding in your documents. This is part of its appeal to advanced Web publishers; it does not normally re-code existing HTML (although you can select Commands > Apply Source Formatting to make your HTML easier to read). The drawback to this, however, is that in preserving your HTML, Dreamweaver may allow some malformed code that you or other programs have entered to go unchecked in your documents. It will prompt you if you do not include essential closing tags, but Dreamweaver may not always rigorously reformat your HTML into a fully compliant version.
In addition to previewing your page across all popular platforms, browsers, and screen resolutions, if you are editing the source for your page and wish to check your work, you should, as always, validate the HTML code in every page you publish. Validators and other HTML tools can be found at http://www.w3.org/ and http://www.htmlhelp.com/.
A. Site Management
To make changes in all pages of your site, the Edit > Find and Replace command from the Site Files window is useful. All other site management functions are listed in Dreamweaver under the Site menu. Even if you are not using Dreamweaver’s FTP functions (described above), you can still use the Edit Sites command to organize your files (but not transfer them between your computer and the Web server). Also, you must define your site in order to work with Templates and Library Objects.
Selecting Site > Site Map will display a folder tree of your site. From here you can drag and drop files, and delete and rename files as needed.
Dreamweaver will prompt you when you make a change that effects other pages (for example if you rename a page that other pages in your site link to), and ask you if the filenames and links in your site should be automatically changed. In most cases you will want Dreamweaver to make automatic adjustments as needed. Another useful tool in the Site menu is the Check Links Sitewide command. This is used to automatically check and fix dead links within your pages (it does not check for dead links pointing to external sites).
B. Rollovers and JavaScript Behaviors
A rollover image is an image that changes when the mouse cursor hovers over it. Rollover images are currently used on the Haverford College Homepage.
Why use Rollovers?
Web designers usually use rollovers to add interactive elements to their web sites. Rollovers are usually used to embellish graphic navigation menus. The downside to using many rollovers is that it slows down the loading of a site, because two images need to be loaded for each rollover.
Start a new line after the description within the table. From the Common tab in the Insert menu on top, click the rollover button:
In the options windows that appears, enter the following information (you can click the Browse... button to locate and select the image files):
Click OK. That's it! To see the rollover effect, preview the page in your browser.
Rollovers are a type of JavaScript command. You can use other JavaScript commands, such as browser checks and popup messages, using Dreamweaver's Behaviors feature. Now let's try another way of adding a rollover image by using Dreamweaver's Behaviors. This will serve as an introduction to how to attach behaviors to objects.
Insert an image by clicking on the image object in the Insert Panel. Insert the arrow_up.GIF image.
Select the "start" graphic that was inserted and open the Behaviors window. You can open the Behaviors window by choosing Window > Behaviors, or by clicking the small gear icon on the bottom right of the document window. Click on the + sign and choose Swap Image as shown below.
In the window that appears, select the arrow_down.GIF image as shown below (do not change the other settings).
Click OK. To see the rollover effect, preview the page in your browser. If you are not comfortable writing JavaScript code, you can use the Behaviors window to make Dreamweaver write more scripts for you.
C. Templates
In this section, you will learn how to use templates to simplify site management. Templates are useful if you have several pages that you want to contain consistent formatting and elements. Note that you must have first defined your site (via the Site menu) before working with Templates.
Right now, clicking on the rollover doesn't do anything. We would like this "start" graphic to link us to a page with more information on the course. But to make that link, we need another Web page We could just create another Web page by going through all the insertion steps in the beginning of the tutorial, but Dreamweaver gives us two other ways to simplify repeated elements.
What's a Template?
A Web page template is a foundation that you can use to build other web pages that use the same structure and elements over and over again. A template is defined with editable and uneditable regions. Typically, Web designers want a consistent look, and templates allow a Web designer to achieve this easily. More importantly, changing the template itself changes all pages that use the template, making it easy to make site-wide changes.
We will first create a template of a Web page using the one we already have. Choose File > Save as Template. Name it "Tutorial".
We now need to tell Dreamweaver which parts of the page are editable and which are uneditable. Highlight the table by clicking on the edge, and then choose Insert> Template Objects > Editable Region. When it asks for a name, enter "table". The other commands under Modify > Templates and Insert > Template Objects are used to define and edit regions in your template.
Editable and Uneditable Regions
Editable regions are regions that can be altered when we create a Web page with a template. Uneditable regions are those that individual pages cannot alter. Uneditable regions can only be updated site-wide when the original template is altered.
Before we create the new page with the template, we need to apply this template to the page we already have so that it too gets updated when we change the template. Close the template window, and open your "start.html" page. You can do this by opening the Site Files window and double clicking on the file, or by choosing File and selecting one of the recently opened files.
With the original Web page open, choose Modify > Templates > Apply Template to Page. Choose the Tutorial template and assign the Document Body to the Table region and the Document Head to the Head region. Delete the parts of the document that have duplicated. You will now find that the main part of the document is outlined in yellow, marking it as a template, and the editable regions are outlined in blue.
Save this page, replacing the one we had.
Now we will create the new Web page Choose File > New. Select the Templates tab. Select your tutorial site and the tutorial template. Click the Create button.
Highlight the description text and the rollover image and delete them (these are in the editable region). Save the new Web page as "home.html". We will add hyperlinks after making the corresponding pages.
Now we will link the rollover image from the start.html page to this page. We will make this link using a neat feature of Dreamweaver. Open the start.html file (if you did not close it, you can access it by choosing Window > start.html). Adjust the document window by dragging its right edge closer to the center so it takes up about half of the screen. Open the Site Files window by choosing Site> Site Files if it is not open.
Select the rollover graphic. In the Properties Panel, click on the compass and drag the cursor over to the Site Files window. Keeping the mouse button down, move the cursor over the "Download" directory. The directory opens. Choose the "home.html" file as shown below.
Suppose we now want a navigation bar right below the horizontal rule. Since this bar will be on every page, we can add it to an uneditable region in our original template. Open the tutorial template: from the Site File window, open the template folder and open the tutorial template (Templates are saved in their own folders named "Templates").
Move the cursor to right in front of the table by choosing the table and then pressing <-. Start a new line.In this new line, type in what is shown in the picture below. The vertical bar is on the keyboard right above the slash key. The text has been centered as well. Again, these will be hyper-linked later. Notice that the blue box encloses this navigation text indicating that Dreamweaver thinks this is editable as well. So we need to make this region uneditable. Choose Modify > Template > Remove Template Markup. But now Dreamweaver has also made the table uneditable as well. So make it editable again by choosing Insert > Template Objects >Editable Region.
Save the template. It will ask whether you want to update the pages created with this template. Select Update and they will be updated automatically.
Open the start.html file. The new navigation text will be displayed.
D. Navigation Bars
You might notice that the navigation bar we created at the end of the previous section is a bit bland. Dreamweaver offers an easy way to create more exciting navigation bars. This is very similar to the rollover images we created previously.
Open the tutorial template by going to Window -> Tutorial.dwt.
Highlight the navigation bar you created in the previous section and delete it.
Choose Insert -> Interactive Images -> Navigation bar.
Fill in the form with similar information as below using images from the downloads folder.
Add additional elements by clicking the + button. Change the order by clicking the arrows. Click OK when you have finished adding elements to the Navigation bar.
You can later modify the navigation bar by going to Modify -> Navigation Bar.If the navigation bar appears as part of the editable region Table follow the previous steps to make it uneditable.
Preview your page now to see the effect of the Navigation Bar.
When you save the template, be sure to apply it to all your pages.
E. Cascading Style Sheets
In this section, we will create a Cascading Style Sheet using Dreamweaver and use it to format Web pages
What are Cascading Style Sheets?
Cascading Style Sheets (CSS) are tools for formatting the appearance of Web pages They do not add content to Web pages (as can JavaScript and Server-Side Includes, for example), but rather define how page content is displayed (by choosing colors, fonts, sizes, and alignments). A style sheet works by defining the attributes of a Web page to have certain characteristics; CSS are HTML attribute definitions that can be then used to consistently format a Web site Changing the definition changes all text in a Web site that uses that definition.
For example, on this page, all Heading 4 elements (those enclosed within
tags) are rendered in a certain font and color. This is accomplished with the CSS code:
h4 { font-family: "trebuchet ms", "times new roman", serif; color: #C00; background: transparent; }
You do not necessarily need to know how to code CSS, however, to use them: Dreamweaver includes tools for making CSS (just as the Web editor is a tool for creating pages without having to know HTML).
When should I use them?
You will benefit most with CSS if you have similar areas throughout your site or page.
CSS is not fully supported by all Web browsers (and will not work at all with very old browsers), and different browsers can apply formatting rules differently. To avoid problems displaying your Web page, you should, as always, preview it on different browsers and platforms before publishing it.
Open the tutorial template, then open the CSS panel can by maximizing the Design panel on the top right and choosing the CSS Styles tab. (You can also choose CSS Styles from the Window menu)
Choose the Attach Style Sheet icon as shown in the picture below.
We will now link a style sheet that does not exist. Doing so creates a new style sheet. Click on Link, and type in what is shown below (the *.css file extension is used for style sheets).
Now we will create new style definitions for this style sheet. Double click the style.css to open that sheet. In the window that appears, click New. Keep Make Custom Style selected in the next window. (You can also create CSS definitions for HTML tags, such as
and
.jpg)
Tidak ada komentar:
Posting Komentar